Adult, Child, and Infant CPR: What Is Covered in Class?

Giving CPR to an Infant

Walking into your first CPR class can feel a bit overwhelming. You know you’re there to learn how to save a life, but the technicalities of “compression-to-breath ratios” and “depth of force” can sound like a lot to manage. Whether you are a new parent, a dedicated teacher, or a workplace safety officer, understanding the nuances of Adult, Child, and Infant CPR is the cornerstone of emergency preparedness.

In this guide, we’ll pull back the curtain on what actually happens during a certification course. You will learn how the techniques shift based on the size of the victim, how to use life-saving technology like an AED, and why “hands-on” practice is the only way to truly gain confidence. By the end of this post, you’ll see that while the steps are specific, they are entirely masterable for anyone willing to learn.

Why do techniques differ for Adult, Child, and Infant CPR?

The most common question students ask is why we can’t just use the same method for everyone. The answer lies in human physiology. An adult’s skeletal structure is rigid and requires significant force to compress the chest enough to circulate blood. Conversely, an infant’s bones are still developing and very flexible; using adult-level force could cause internal damage.

In a professional CPR class, you’ll learn that “Adult” generally refers to anyone who has reached puberty, “Child” is from age one to puberty, and “Infant” is anyone under one year old. Your instructor will show you how to quickly “size up” a victim to determine which protocol to use. The goal is always the same—to act as a manual pump for the heart—but the tools (your hands, fingers, and breath) must be calibrated to the victim.

What are the specific steps for Adult CPR training?

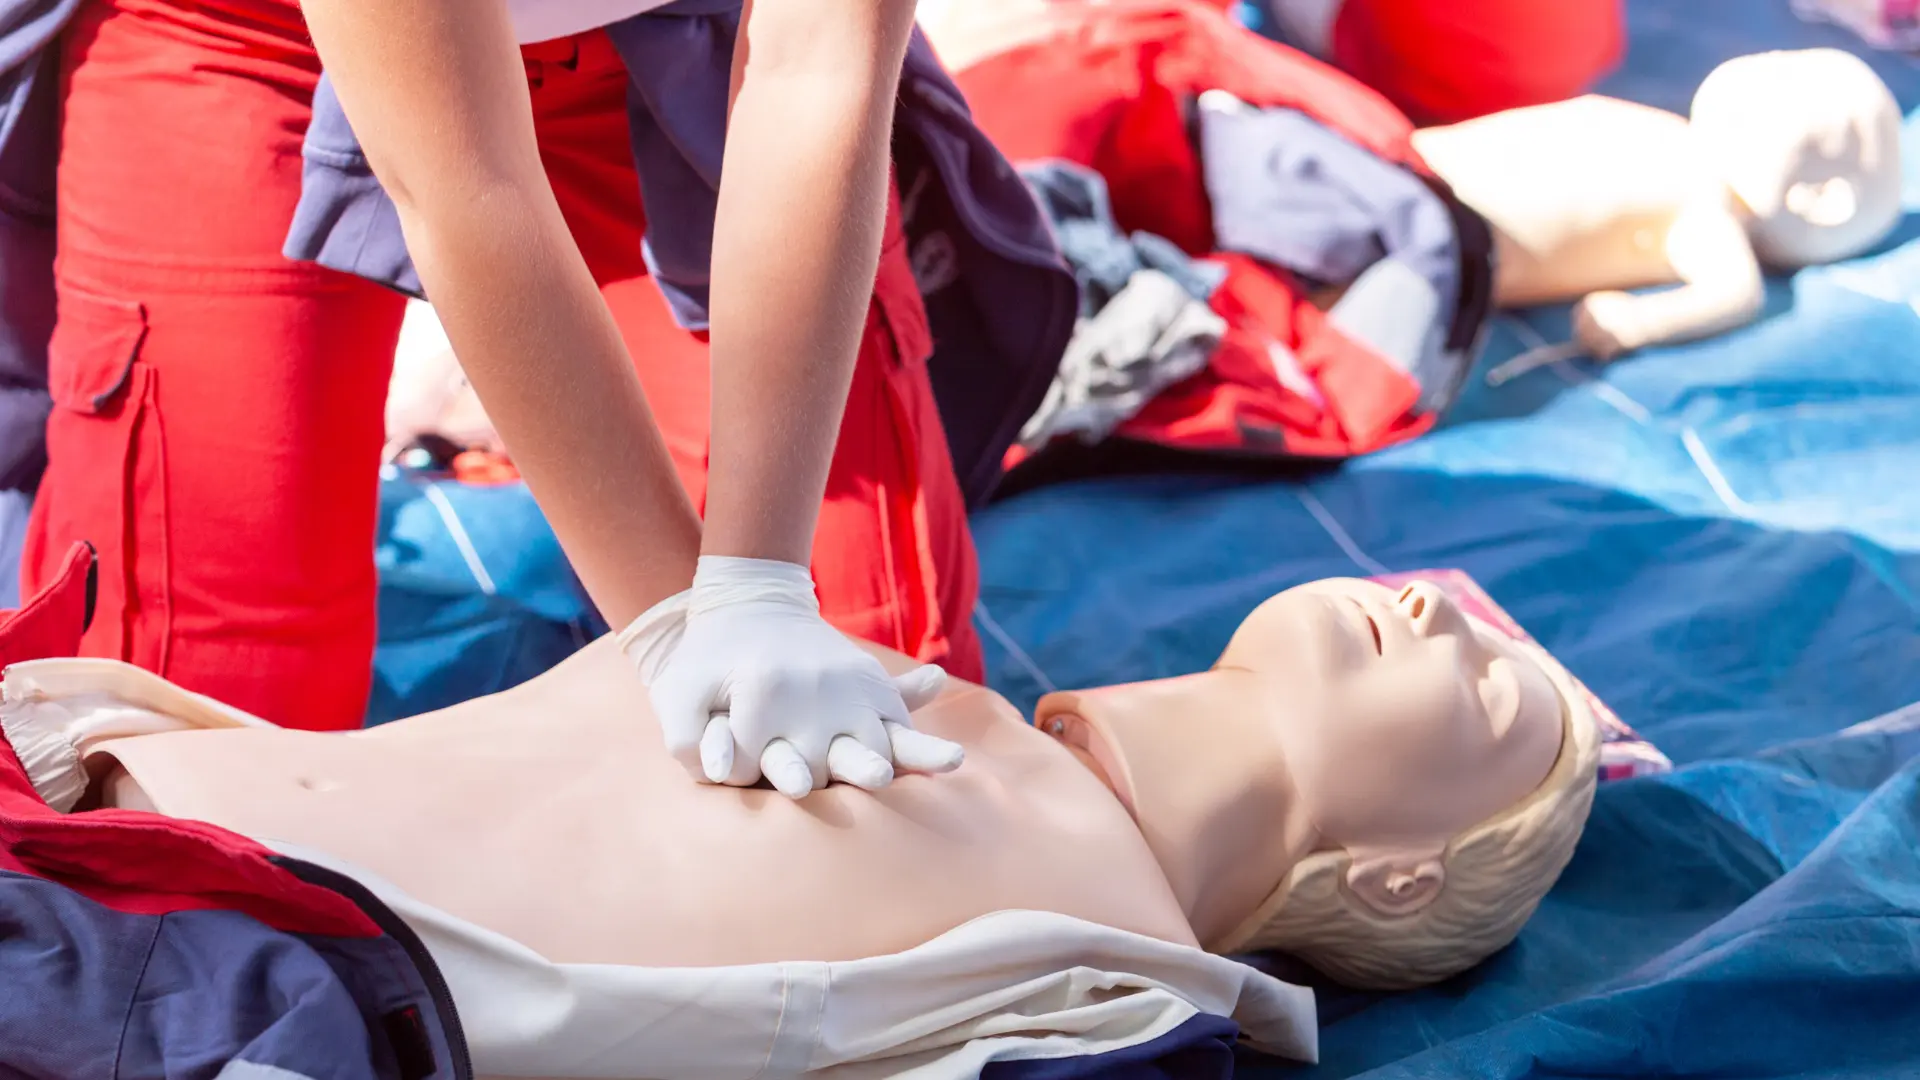
Adult CPR is the foundation of most classes. Because cardiac arrest in adults is often caused by a heart issue, the focus is on high-quality chest compressions to keep oxygenated blood moving to the brain.

In class, you will practice:

  • Scene Safety and Assessment: Learning how to check if the environment is safe for you and the victim before you begin.
  • Chest Compressions: Using two hands, interlocked, in the center of the chest. You’ll learn to push down at least 2 inches at a rate of 100 to 120 beats per minute (think of the rhythm of “Stayin’ Alive”).
  • Rescue Breaths: Mastering the head-tilt/chin-lift maneuver to open the airway and delivering two breaths that make the chest visibly rise.
  • The 30:2 Ratio: Hard-coding the cycle of 30 compressions followed by 2 breaths into your muscle memory.

How does Child CPR differ from Adult CPR?

When it comes to children, the emergency is often respiratory-based (like drowning or choking) rather than a primary heart problem. This makes the “rescue breath” portion of the training particularly vital.

During the “Child” module of your class, you will focus on:

  • One-Handed vs. Two-Handed Compressions: Depending on the size of the child, you may only need the heel of one hand to reach the required 2-inch depth.
  • Modified Force: You’ll practice pressing down about one-third the depth of the chest, ensuring you aren’t using the full weight of your upper body as you would for an adult.
  • Prevention and Recognition: Instructors often touch on common childhood emergencies and how to spot the signs of respiratory distress before the heart stops.

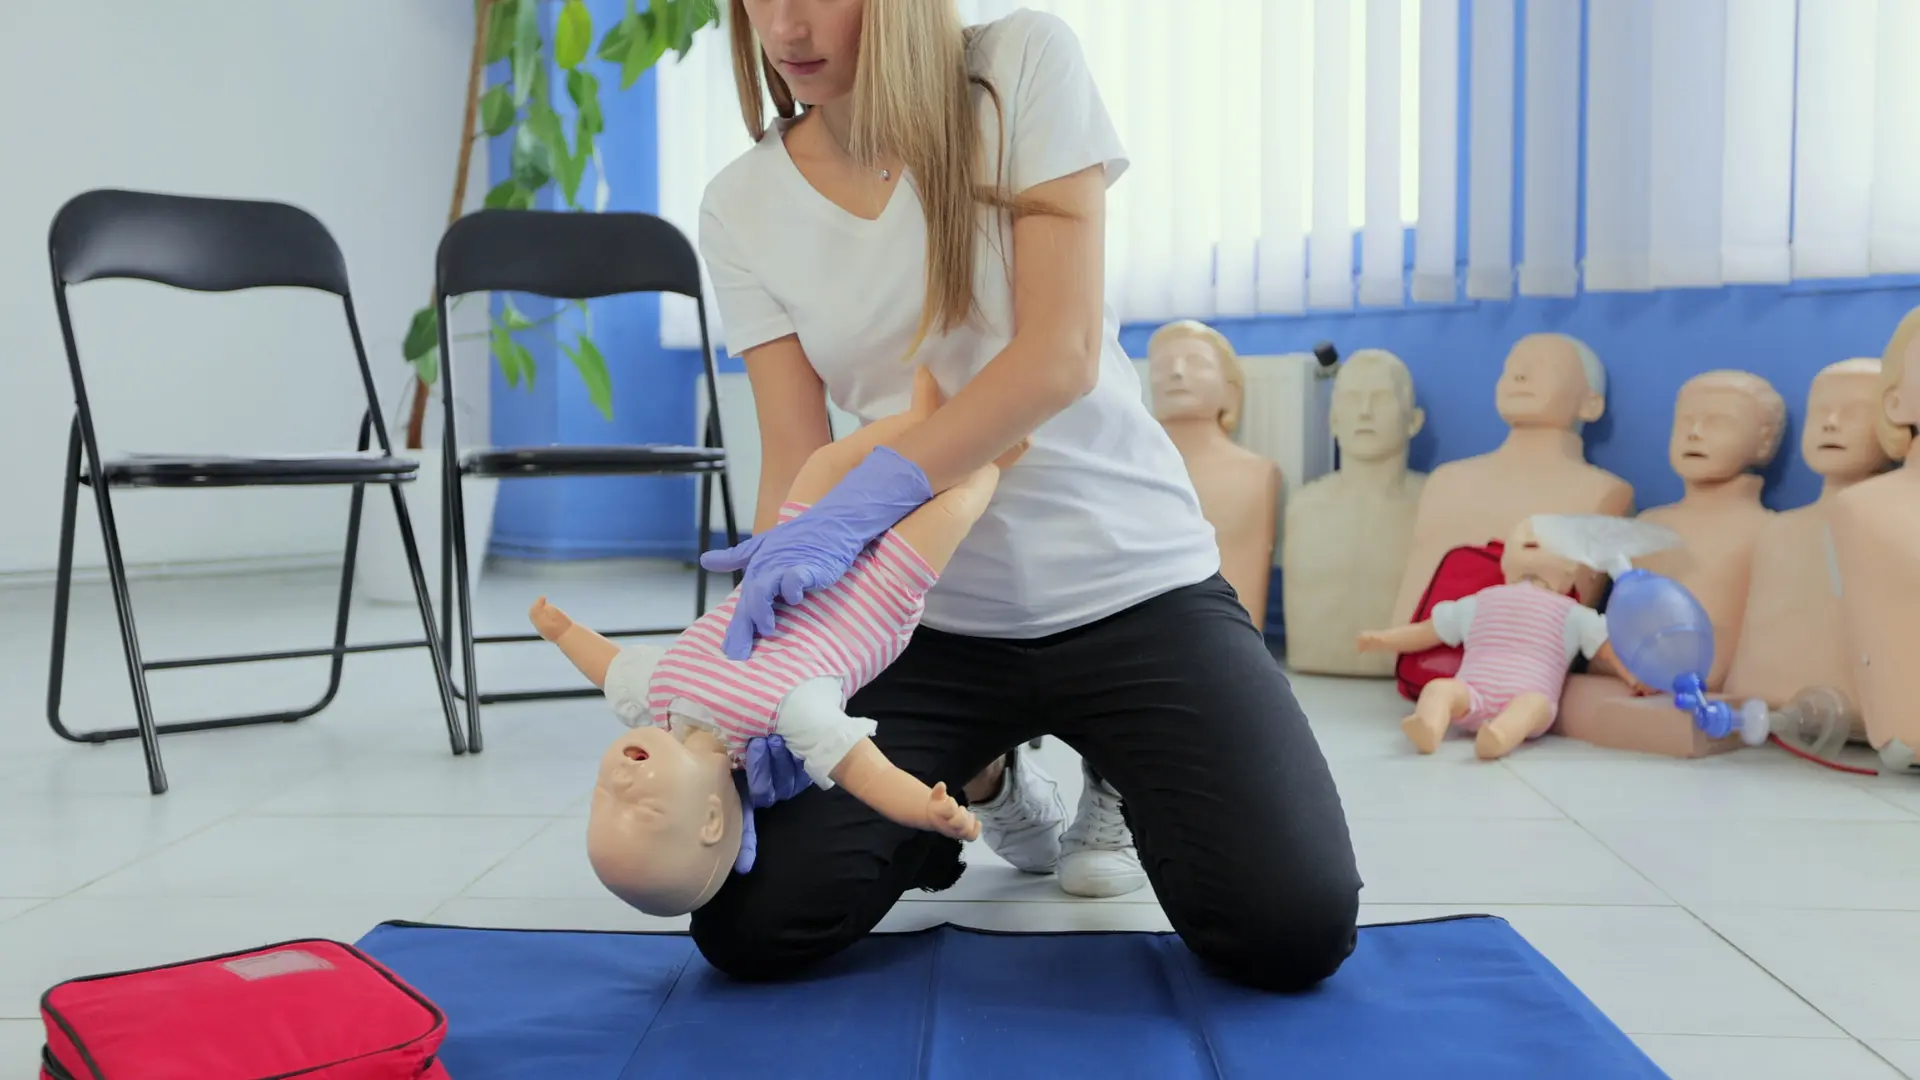
What is included in Infant CPR instruction?

Infant CPR is perhaps the most delicate part of the course. It requires a high level of precision because you are working with a very small surface area.

What you will practice on infant manikins:

  • The Two-Finger Technique: Instead of using your palms, you use two fingers (or two thumbs with the hands-encircling technique) in the center of the chest.
  • 1.5 Inch Depth: Learning the “feel” of a shallower compression.
  • Puffs, Not Breaths: Because an infant’s lungs are small, you don’t give a full breath. You provide “puffs” of air using your cheeks, covering both the infant’s nose and mouth with your mouth to create a seal.
  • Response Checks: Instead of shaking the shoulders, you’ll learn to flick the bottom of the baby’s foot to check for responsiveness.

How do we learn to use an AED for all ages?

An Automated External Defibrillator (AED) is a device that can literally restart a heart. Most modern Adult, Child, and Infant CPR classes include a dedicated AED module because using one along with CPR can more than double the victim’s chance of survival.

You will learn:

  • Device Operation: How to turn the device on and follow the voice prompts (it tells you exactly what to do).
  • Pad Placement: Where to place the adhesive pads on an adult’s chest versus a child’s or infant’s chest.
  • Pediatric Settings: How to use “pediatric pads” or a “child key” to reduce the energy of the shock for smaller victims.
  • Clearance: The importance of making sure no one is touching the victim when the shock is delivered.

What are the choking relief maneuvers covered in class?

Choking is a leading cause of accidental death, especially in children and the elderly. A comprehensive class will teach you how to clear an airway for every age group.

  • For Adults and Children: You will practice the abdominal thrust (Heimlich Maneuver), learning exactly where to place your fists to create the necessary upward pressure.
  • For Infants: You will learn the “5 back blows and 5 chest thrusts” method. This involves supporting the infant face-down on your forearm to let gravity help clear the obstruction.
  • Self-Relief: Many instructors will also show you how to perform a modified version of these maneuvers on yourself if you are alone and choking.

What should I expect during the hands-on skills test?

To receive your certification, you won’t just watch videos; you have to demonstrate that you can perform the skills.

At CPR Classes Near Me, we prioritize “Practice-While-Watching.” This means you’ll have a manikin in front of you for the duration of the class. You’ll perform cycles of CPR while an instructor watches your form, correcting your hand placement or compression depth in real-time. This real-world application is what builds the “active” knowledge required to stay calm in a crisis.

Conclusion: Your Next Steps toward Preparedness

Learning Adult, Child, and Infant CPR is one of the most selfless and practical skills you can acquire. Whether you’re protecting your own family or fulfilling a requirement for your career, the knowledge gained in these few hours has the potential to change a life’s trajectory. You’ve now seen that the class covers everything from the force of a compression to the nuances of an AED shock.

Don’t wait for an emergency to realize you aren’t prepared. The confidence you need is only a class away.

Ready to gain these life-saving skills? Contact CPR Classes Near Me today to find a certification course that fits your schedule!

FAQ Section

How long does an Adult, Child, and Infant CPR class take?

Most comprehensive classes that cover all three age groups take between 3 and 4 hours to complete. This includes video instruction, hands-on practice, and the final skills assessment. Some “blended” options allow you to do the classroom portion online, reducing the in-person time to about 1 to 2 hours.

Do I need a separate certification for infants and adults?

No, most standard “CPR/AED” or “Healthcare Provider” courses are designed to be “all-ages” certifications. These courses bundle Adult, Child, and Infant CPR into one curriculum so you are prepared for any scenario. Always check the course description to ensure “Pediatric” or “Infant” modules are included.

Is there a written test for CPR certification?

Depending on the certifying body (like the AHA), there may be a short multiple-choice exam at the end of the class. However, the most important part of the process is the “skills check,” where you demonstrate the physical techniques on a manikin to the satisfaction of your instructor.

How often do I need to renew my CPR training?

CPR certifications are typically valid for two years. This is because research shows that CPR skills can degrade over time, and medical guidelines are updated periodically to reflect the latest life-saving science.

Can I hurt someone by performing CPR?

While it is possible to crack a rib during high-quality compressions, it is important to remember that the person is clinically dead if their heart has stopped. A cracked rib can heal; brain death from lack of oxygen cannot. Training helps you apply the correct amount of force to be effective while minimizing unnecessary injury.

CPR Techniques for Different Age Groups: Be Prepared to Save a Life

CPR Techniques for Different Age Groups

CPR Techniques for Different Age Groups: Be Prepared to Save a Life

CPR Techniques for Different Age Groups

Knowing CPR (Cardiopulmonary Resuscitation) is a valuable skill that can mean the difference between life and death. Early intervention with CPR can significantly increase the chances of survival for someone experiencing cardiac arrest. However, CPR techniques vary depending on the age of the person needing help. This article will provide a comprehensive guide to CPR Techniques for Different Age Groups, empowering you to act effectively in an emergency.

Why Are There Different CPR Techniques for Different Age Groups?

An adult body has a different physiology than a child’s body, and an infant’s body is even more delicate. The size and fragility of bones, the depth of the chest cavity, and the appropriate compression force all differ significantly across age groups. Using the wrong technique could be ineffective or even cause injuries.

Here’s a breakdown of the key considerations for CPR techniques by age group:

  • Adults (Puberty and Older): Adults require the most forceful compressions as their chest cavity is deeper. Techniques involve using the heel of one or both hands for chest compressions.
  • Children (1 year to Puberty): Children require less forceful compressions than adults due to their smaller chest size. Techniques may involve using one or two hands depending on the child’s size.

Infants (Newborn to 1 year): Infants require the gentlest approach with minimal pressure. Techniques involve using only two fingers for chest compressions on the center of the chest.

CPR Techniques for Adults

Here’s a step-by-step guide to performing CPR on Adults:

  1. Scene Safety: Before approaching the victim, ensure your safety and the safety of others. Check for any dangers like electrical hazards or traffic.
  2. Check for Responsiveness: Gently shake the victim’s shoulders and ask loudly, “Are you okay?” If they don’t respond, call for emergency services immediately (dial 911 in the US) or ask someone else to do so.
  3. Position the Victim: Lay the victim flat on their back on a firm surface.
  4. Open the Airway: Tilt the head back slightly and lift the chin to open the airway.
  5. Check for Breathing: Look, listen, and feel for normal breathing for no more than 10 seconds. If they are not breathing normally, begin CPR.
  6. Chest Compressions: Locate the center of the chest, which is the lower half of the breastbone. Place the heel of your dominant hand on the center of the chest and your other hand on top, interlocking your fingers. Position yourself directly over the chest and use your body weight (not just your arms) to push down firmly and evenly on the chest by about 2 inches (5 cm). Aim for a rate of 100-120 compressions per minute.
  7. Rescue Breaths: After every 30 chest compressions, pinch the victim’s nose closed with your thumb and index finger. Create a seal with your mouth over their mouth and blow one breath for about 1 second, watching for the chest to rise.
  8. Continue CPR: Continue cycles of 30 chest compressions to 2 rescue breaths until help arrives, the victim starts breathing normally, or you become exhausted.

Additional Tips for Adult CPR:

  • Maintain a steady and consistent rhythm during chest compressions.
  • Avoid pausing for too long between compressions and breaths.
  • If you are uncomfortable performing rescue breaths, continue with chest compressions only.
  • An Automated External Defibrillator (AED) can be used if available. Follow the voice prompts on the AED.

CPR Techniques for Children

Scene Safety: As with adults, ensure your safety and the safety of others before approaching the child. Look for any immediate dangers like electrical hazards, traffic, or drowning hazards (if near water). If the scene is unsafe, remove the child from danger if possible without putting yourself at risk.

Check for Responsiveness: Gently tap the child’s shoulder and ask loudly, “Are you okay?” in a clear and firm voice. If the child doesn’t respond or show any signs of movement, shout for help from bystanders and call emergency services immediately.

Position the Victim: Lay the child flat on their back on a firm, stable surface. If the child is on a soft surface like a couch, carefully move them to a firmer surface suitable for CPR.

Open the Airway: Use the head-tilt chin-lift maneuver specifically adapted for children. Tilt the head back slightly by placing one hand on the forehead and gently applying pressure. With your other hand, lift the chin by placing two fingers under the bony part of the lower jaw and lifting it slightly. Avoid tilting the head back too far, as this can block the airway.

Check for Breathing: Look, listen, and feel for normal breathing for no more than 10 seconds. Look for chest movement, listen for breaths, and feel for air coming out of the nose or mouth. If the child is not breathing normally (gasping, shallow breaths, or no breaths at all), begin CPR.

Chest Compressions for Children: Locate the center of the chest, which is the lower half of the breastbone. The placement of hands for chest compressions depends on the child’s size:

  • One-Handed Compressions (Smaller Children): If the child is smaller and your hand can comfortably encircle half of the chest, use the heel of one hand placed in the center of the breastbone.
  • Two-Handed Compressions (Larger Children): For larger children, use two hands. Place the heel of your dominant hand on the lower half of the breastbone, with the other hand on top, fingers interlocking across the child’s back.

Push down firmly and evenly by about 2 inches (5 cm) at a rate of 100-120 compressions per minute.  Imagine pushing down about one-third of the depth of the chest cavity. Use your body weight to deliver effective compressions, but avoid bouncing on the chest. After each compression, allow the chest to rise completely before pushing down again.

Rescue Breaths for Children:

  1. Pinch the child’s nose closed with your thumb and index finger.
  2. Create a seal with your mouth over the child’s mouth, ensuring a good fit.
  3. Blow one small breath for about 1 second, just enough to see the chest rise. Avoid blowing too hard, as this can overinflate the lungs.
  4. Allow the chest to fall completely between breaths before delivering the next breath.

Continue CPR for Children: Continue cycles of 30 chest compressions to 2 rescue breaths until help arrives, the child starts breathing normally again, or you become exhausted. Ideally, continue CPR until professional medical help takes over.

CPR Techniques for Infants

CPR for infants requires the most delicate approach due to their extremely fragile bodies. Here’s a step-by-step guide:

  1. Scene Safety: As always, ensure your safety and the safety of others.
  2. Check for Responsiveness: Gently tap the infant’s foot and ask loudly, “Are you okay?” If they don’t respond, call for emergency services immediately.
  3. Position the Infant: Lay the infant flat on their back on a firm surface.
  4. Open the Airway: Use a two-finger technique to open the airway. Place two fingers on the bony part just below the infant’s nose and gently tilt the head back while lifting the chin slightly.
  5. Check for Breathing: Look, listen, and feel for normal breathing for no more than 10 seconds. If they are not breathing normally, begin CPR.
  6. Chest Compressions for Infants: Locate the center of the chest, which is the area just below the nipple line. Use two fingers (thumb and index finger) placed in the center of the chest to deliver compressions.
  7. Push down firmly and evenly by about 1 to 1.5 inches (2.5 to 4 cm) aiming for a rate of 120 compressions per minute.
  8. Rescue Breaths for Infants: Pinch the infant’s nose closed with your thumb and index finger. Create a seal with your mouth over both the infant’s mouth and nose and blow one very small breath for about 1 second, just enough to see the chest rise.
  9. Continue CPR for Infants: Continue cycles of 30 chest compressions to 2 rescue breaths until help arrives, the infant starts breathing normally, or you become exhausted.

Additional Tips for Infant CPR:

  • Be extremely gentle with the infant’s chest.
  • The depth of chest compressions should be about one-third of the chest’s anteroposterior (front-to-back) diameter.
  • If you are uncomfortable performing rescue breaths, continue with chest compressions only.
  • An AED is not typically used for infants. However, if an AED is readily available, follow the voice prompts.
  •  

Find the Best CPR Training Classes in Phoenix

In an emergency situation where someone experiences cardiac arrest, immediate CPR intervention can significantly increase their chances of survival. But with so many CPR training options available in Phoenix, how do you find the best class for you?

Here’s what to look for when choosing a CPR training class in Phoenix:

  • Experienced Instructors: Seek instructors certified by reputable organizations like the American Heart Association (AHA) or the American Red Cross. Experienced instructors ensure you receive the most up-to-date CPR techniques and can effectively guide you through the hands-on practice sessions.
  • Flexible Class Schedules: Busy schedules shouldn’t prevent you from learning CPR. Look for training providers offering classes at various times and days to accommodate your needs.
  • Convenient Locations: Choose a class location that’s easily accessible for you, minimizing travel time and maximizing convenience.
  • Comprehensive Training: Ensure the class covers CPR techniques for all age groups, including adults, children, and infants. Ideally, the class should also include Automated External Defibrillator (AED) training, which can be crucial in certain emergencies.
  • Hands-on Practice: Effective CPR requires muscle memory developed through practice. Look for classes that dedicate significant time to hands-on practice sessions on mannequins, allowing you to refine your skills and build confidence.
  • Certification: Upon successful completion of the CPR class, you should receive a valid CPR certification card from a recognized organization. This certification demonstrates your competence and may be required for certain jobs or volunteer positions.

Conclusion

CPR is a lifesaving skill that everyone should consider learning. By understanding the CPR Techniques for Different Age Groups, you can be prepared to act effectively in an emergency situation. Remember, early intervention with CPR can significantly increase the chances of survival for someone experiencing cardiac arrest.

AHA BLS CPR & AED Classes

Starting at $59.95
American Heart Association BLS CPR & AED Certification 
Our CPR Trainers are American Heart Association Certified. We teach the best CPR Classes and deliver your certification eCard the same day. Get your AHA BLS CPR Certification and save now!