How to Prepare for a CPR Skills Test: Your Step-by-Step Guide to Passing

CPR Archives

No Comments
Emergency medics performing CPR on patient with spinal support stretcher in Chicago

So, you’ve finished the online portion of your CPR course, or maybe you’re gearing up for a full in-person session. Now comes the part that makes many people a little nervous: the CPR skills test.

Think of the skills test as a “practical check-in.” It’s not about tricking you; it’s about making sure that if you ever find yourself in a real-life emergency, your hands know exactly what to do. At CPR Classes Near Me, we want you to walk into that room feeling like a pro.

In this guide, we’ll break down everything you need to know to prepare, practice, and pass your CPR skills check on the very first try.

What exactly happens during a CPR skills test?

The skills test is a hands-on evaluation where you demonstrate your life-saving abilities to a certified instructor. Unlike the written exam, which tests your “head knowledge,” the skills test evaluates your “muscle memory.”

Typically, the test follows a specific scenario provided by the instructor. You will be asked to:

  • Assess the scene for safety.
  • Check for responsiveness and breathing.
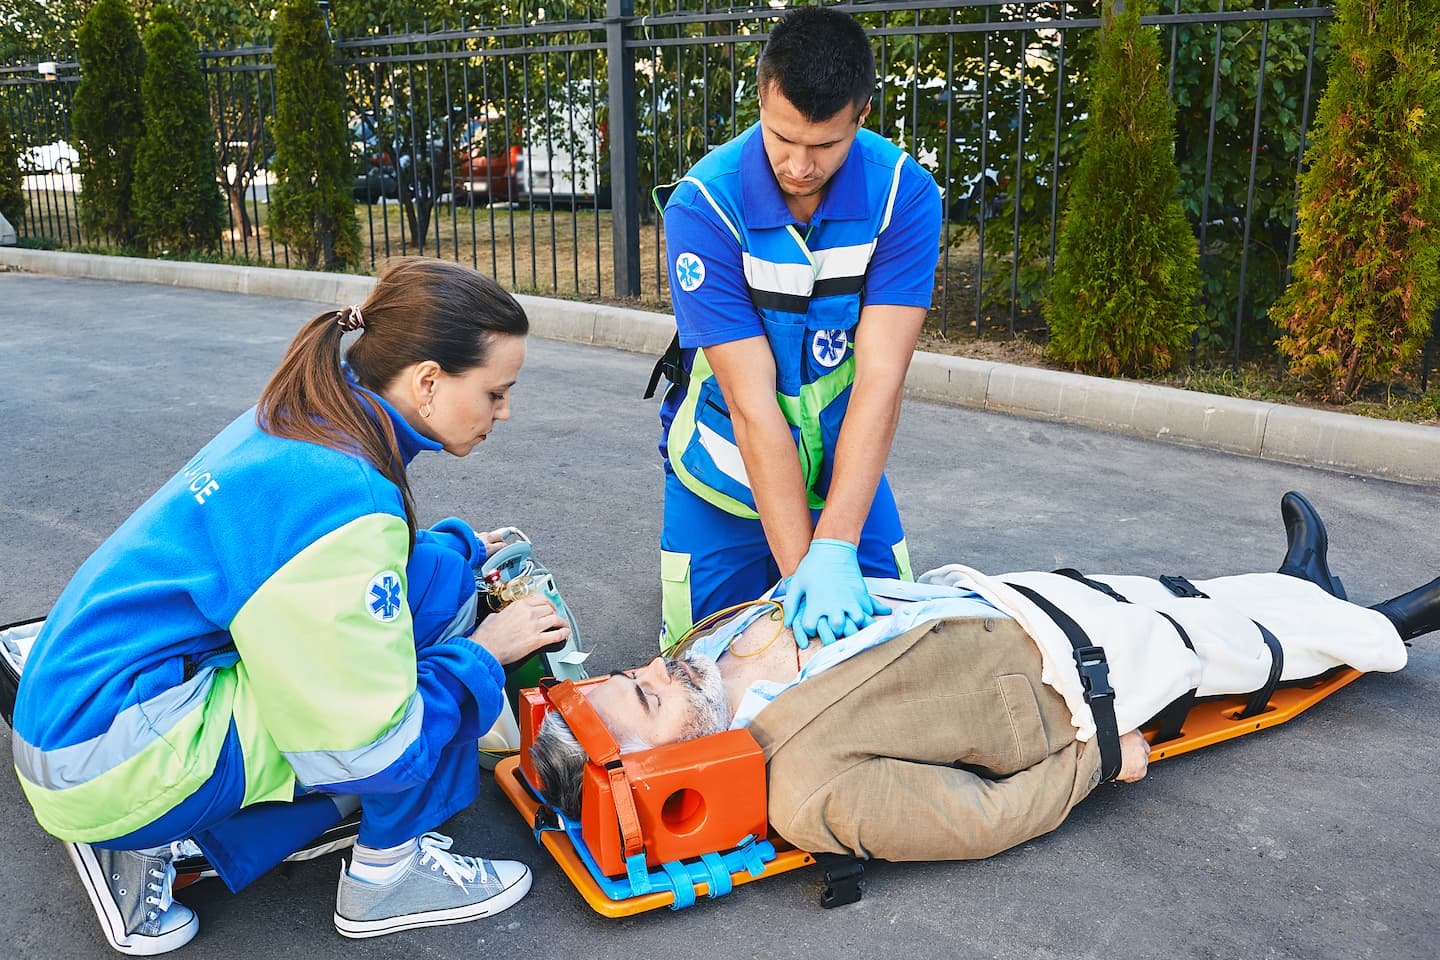
  • Activate emergency services (call 911).
  • Perform high-quality chest compressions and rescue breaths on a manikin.
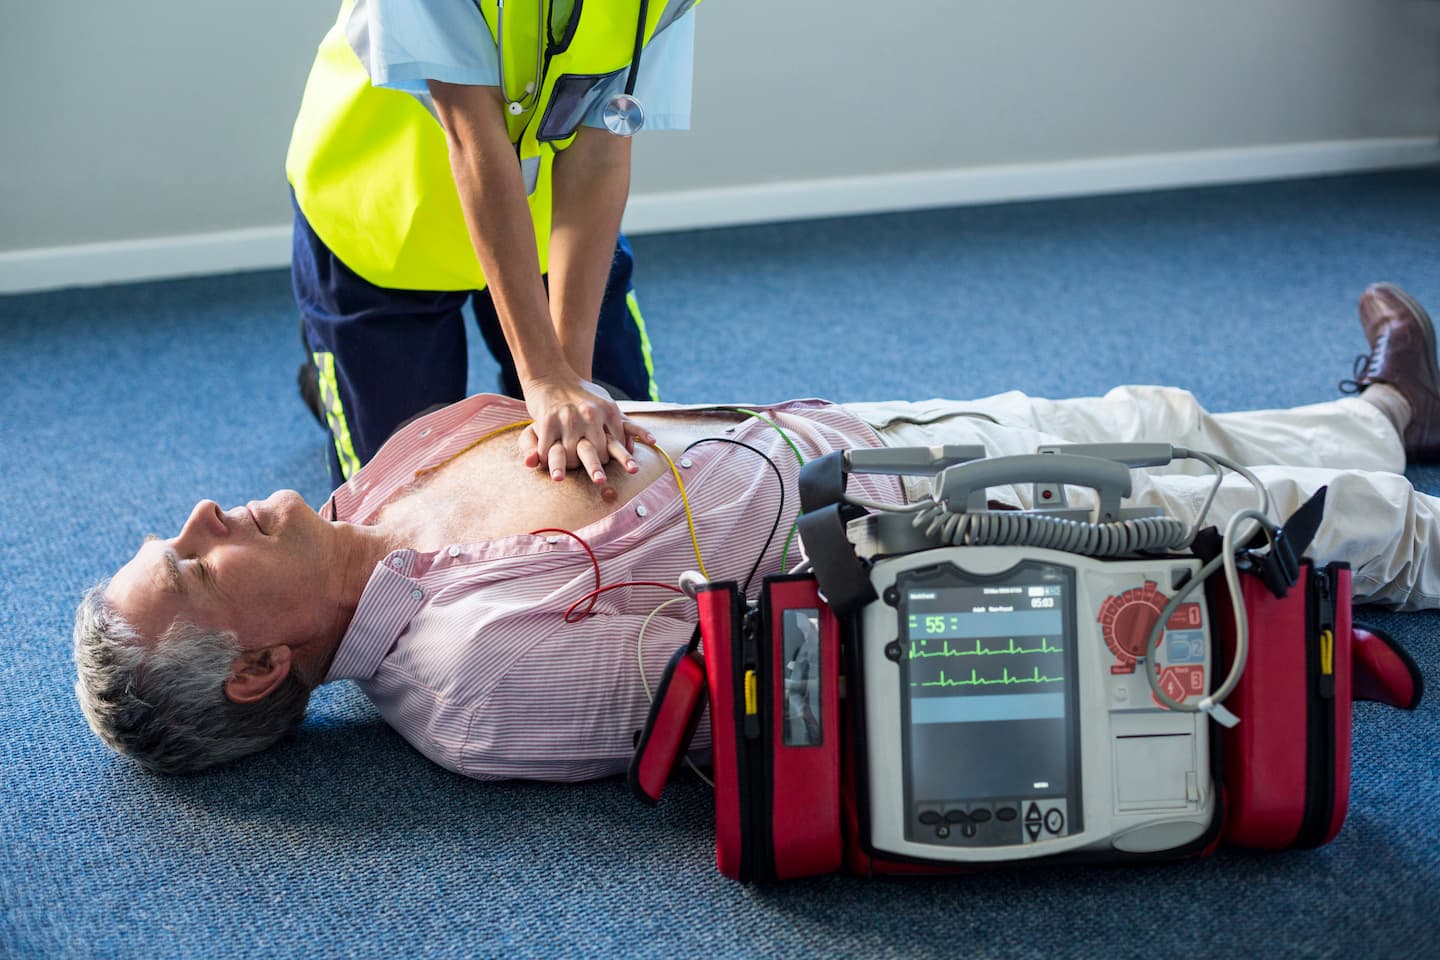
  • Correctly use an Automated External Defibrillator (AED).

The instructor uses a standardized checklist—usually from the American Heart Association (AHA) or Red Cross—to mark off each step as you complete it correctly.

How do I prepare my body and mind for the test?

Preparation starts before you even walk through the door. Because CPR is physically demanding, a little bit of physical and mental prep goes a long way.

  1. Dress for the occasion: You’ll be on your knees on the floor for a good portion of the test. Wear comfortable, loose-fitting clothes and flat shoes. Avoid skirts or very tight pants.
  2. Review the “Big Numbers”: Memorize the critical numbers so you don’t have to think about them during the test:
    • Rate: 100–120 compressions per minute.
    • Depth: At least 2 inches for adults.
    • Ratio: 30 compressions to 2 breaths (for single-rescuer adult CPR).
  3. Visualize the flow: Close your eyes and run through the “Check-Call-Care” sequence. Visualizing yourself successfully completing the steps reduces anxiety.

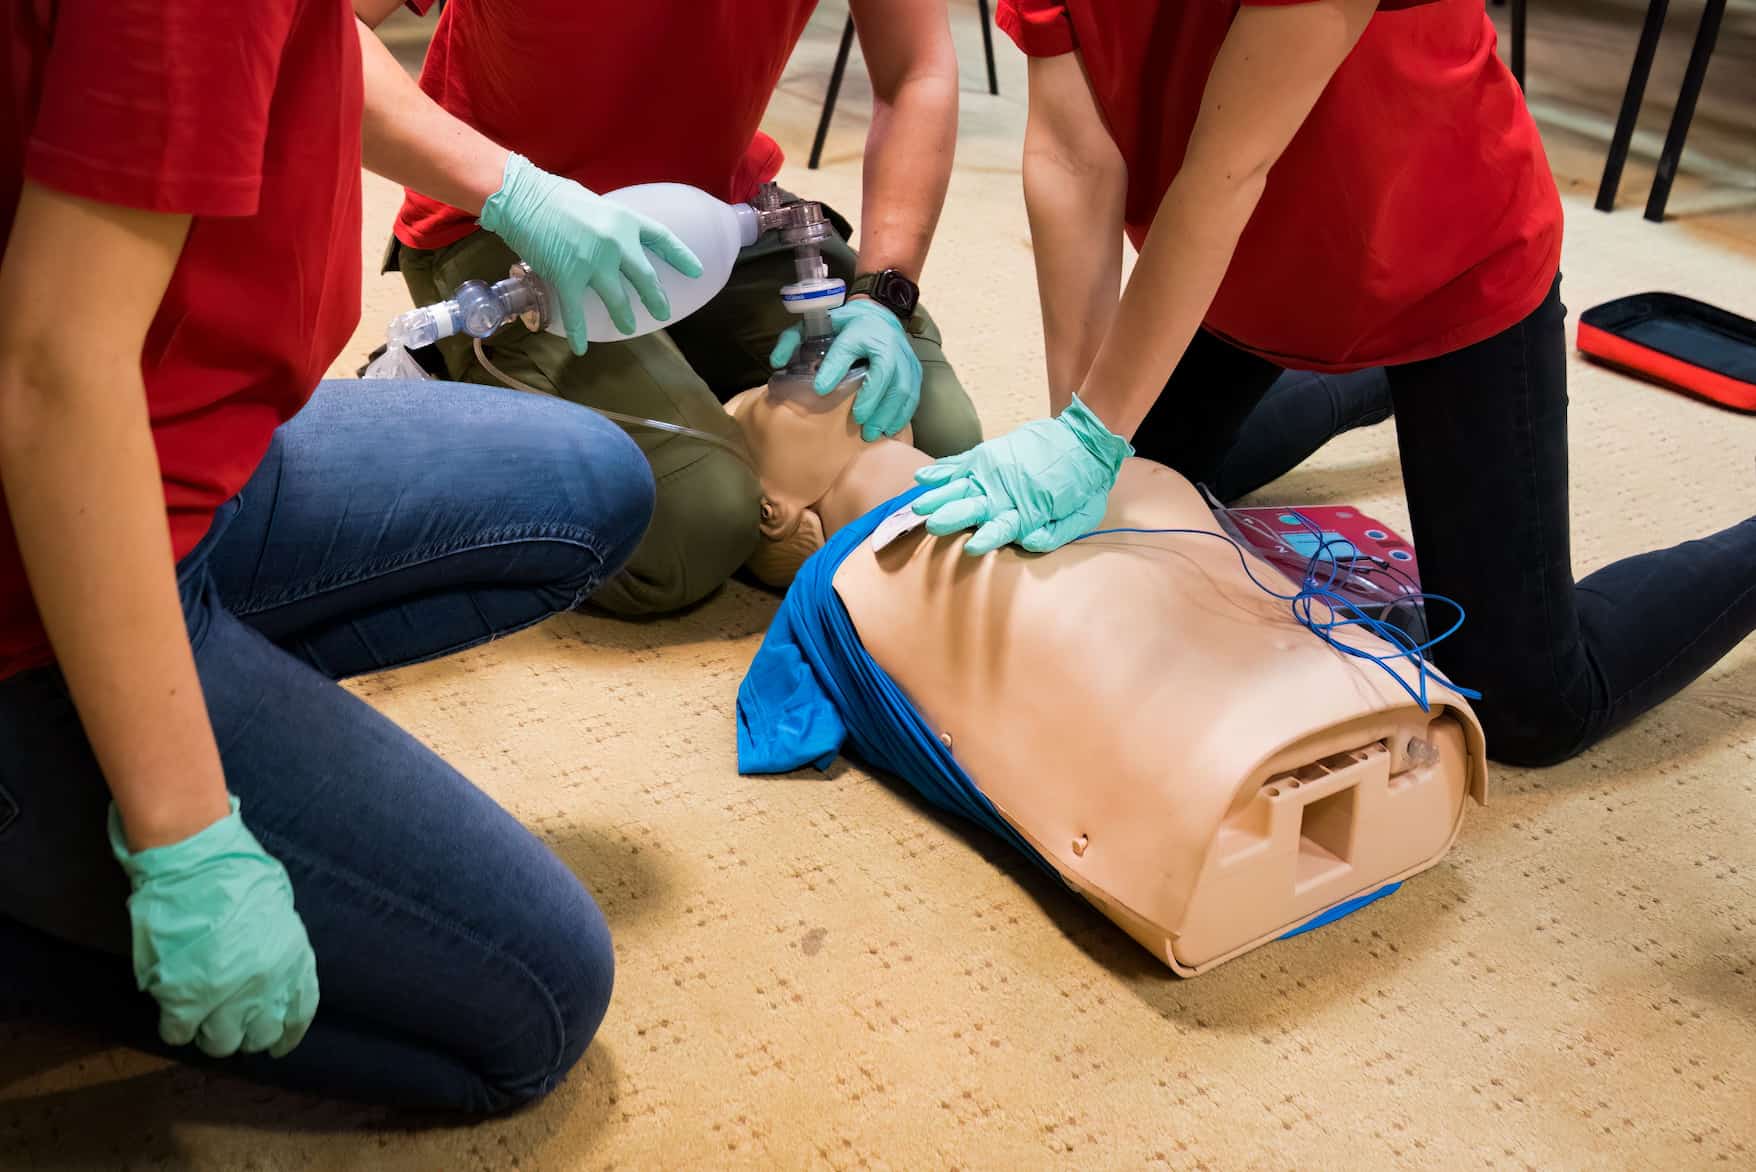
What are the keys to high-quality chest compressions?

Compressions are the most important part of the test. Instructors look for “high-quality CPR,” which means you aren’t just pushing; you’re pushing effectively.

  • Hand Placement: Place the heel of one hand on the center of the chest (lower half of the breastbone) and the other hand on top.
  • Body Mechanics: Lock your elbows and position your shoulders directly over your hands. Use your body weight to push, not just your arm muscles. This prevents fatigue.
  • Allow Full Recoil: This is a big one! After every push, let the chest come all the way back up to its normal position. If you “lean” on the chest, the heart can’t refill with blood.
  • The “Stayin’ Alive” Rhythm: Aim for 100–120 beats per minute. Pushing too fast is just as ineffective as pushing too slowly.

How do I master the rescue breathing portion?

Rescue breaths are often where students lose points, usually because they are rushed. To pass this section, focus on these details:

  1. Open the Airway: Use the head-tilt/chin-lift maneuver. If the airway isn’t open, the air won’t go in.
  2. Seal the Barrier: Whether you’re using a pocket mask or a face shield, ensure it’s airtight.
  3. Watch for Chest Rise: Give each breath over 1 second. You should see the manikin’s chest physically rise. If it doesn’t, reposition the head and try one more time.
  4. Don’t Over-Ventilate: Only give enough air to see the chest rise. Blowing too hard can actually be harmful.

What is the correct way to use an AED during the test?

The AED is a “set it and forget it” device, but you have to follow its instructions perfectly. In a skills test, the instructor wants to see that you can integrate the AED without stopping CPR for too long.

  • Turn it on immediately: As soon as the AED arrives, power it on.
  • Follow the prompts: The device will tell you exactly when to attach pads, when to stay clear, and when to push the shock button.
  • Clear the victim: Loudly and clearly shout “Clear!” and look to ensure no one is touching the manikin before the AED analyzes or delivers a shock.
  • Resume CPR: Immediately after a shock (or if “no shock advised”), start compressions again. Don’t wait for the instructor to tell you to start.

What are the most common mistakes that lead to failure?

Even the best students can make simple mistakes under the pressure of a stopwatch. Here is what to avoid:

  1. Forgetting to call 911: It sounds silly, but many people jump straight into compressions and forget to “activate the emergency response system.”
  2. Shallow compressions: If you don’t hit that 2-inch depth, the blood isn’t reaching the brain.
  3. Taking too long between cycles: Interruptions in compressions should be less than 10 seconds. This includes the time it takes to give breaths.
  4. Leaning: Failing to let the chest recoil fully is a common reason for “Needs Remediation.”

How can I practice without a manikin at home?

While you need a manikin for the official check, you can practice the “flow” anywhere.

  • Use a Pillow: While it doesn’t offer the same resistance, practicing your hand placement and rhythm on a firm pillow helps with muscle memory.
  • Use a Metronome: Download a free metronome app and set it to 110 bpm. Practice tapping your hands to that beat until it feels natural.
  • Verbalize the Steps: Practice saying out loud, “The scene is safe. Are you okay? Call 911!” This helps solidify the sequence in your mind.

Conclusion

Preparing for a CPR skills test is all about confidence and consistency. Remember, the instructor wants you to pass! They are there to ensure you are a capable link in the “Chain of Survival.” By focusing on high-quality compressions, mastering the AED prompts, and keeping your rhythm steady, you’ll be ready to handle any scenario thrown your way.

Ready to get certified? Whether you’re a first-timer or need a renewal, CPR Classes Near Me makes it easy to find high-quality, local training that fits your schedule. Don’t wait until an emergency happens—get the skills you need today.

Contact CPR Classes Near Me today to find a skills check location near you!

Frequently Asked Questions (FAQ)

Q: What happens if I fail the CPR skills test?

A: Don’t panic! If you don’t pass a specific skill, most instructors provide “remediation.” This means they will coach you on what went wrong and allow you to practice and try again during the same session. The goal is competency, not perfection on the first try.

Q: Do I have to give mouth-to-mouth during the test?

A: Most modern CPR classes use barrier devices like pocket masks or face shields. You are generally not required to have direct mouth-to-mouth contact with the manikin. In some “Hands-Only CPR” sessions, rescue breaths might be skipped entirely, but for a full certification, you will demonstrate breaths using a barrier.

Q: How long does the skills check take?

A: If you have already completed the online coursework (blended learning), the in-person skills check usually takes between 30 and 60 minutes, depending on the number of students in the class.

Q: Is there a written test too?

A: Yes, most certification levels (like BLS or Heartsaver) require both a written exam (usually multiple choice) and a physical skills test. You typically need a score of 80% or higher to pass the written portion.

Q: Can I wear my watch or jewelry during the test?

A: It’s best to remove large watches or dangling bracelets, as they can get caught or be uncomfortable when you are performing deep chest compressions.

Is Your Life-Saving Skill Set Up to Date? A Guide to CPR Renewal

Paramedic performing CPR with defibrillator on cardiac arrest patient

Whether you are a seasoned nurse, a dedicated high school coach, or a proactive parent, your CPR certification is more than just a piece of paper—it’s a promise to be ready when the unthinkable happens. But as time passes, even the most diligent responders can find their skills getting a little rusty.

In the world of emergency response, “staying current” isn’t just a suggestion; it’s a necessity. Medical guidelines evolve, technology like AEDs becomes more advanced, and your muscle memory naturally fades. This comprehensive guide will walk you through everything you need to know about renewing your CPR certification, ensuring you remain a confident and capable link in the chain of survival.

Why is CPR certification renewal necessary?

The most critical reason to renew your CPR certification is skill retention. Research from major health organizations shows that CPR skills begin to decline significantly just a few months after training. By the two-year mark, many people struggle to remember the correct compression depth or the proper ratio of breaths to pumps. Regular renewal forces you to refresh that muscle memory so that you don’t hesitate during a real emergency.

Beyond the physical skills, renewal keeps you informed about the latest science. Every few years, organizations like the American Heart Association update their “Chain of Survival” based on new data. What was considered “best practice” five years ago might be outdated today. Renewal ensures you are providing the most effective care possible based on the latest life-saving research.

Finally, for many, it is a matter of professional survival. If you work in healthcare, education, or childcare, a lapsed certification can lead to immediate suspension or even the loss of your license. Staying ahead of your expiration date is the best way to avoid unnecessary professional stress.

When should you start the renewal process?

Most CPR certifications are valid for exactly two years from the date of your last class. You can find this date printed clearly on your provider card or within your digital certificate portal. However, you shouldn’t wait until the day before it expires to start looking for a class.

We recommend starting the renewal process at least 30 to 60 days before your current card expires. This “buffer zone” is essential for a few reasons:

  1. Class Availability: Popular time slots (like Saturday mornings) can fill up weeks in advance.
  2. Abbreviated Options: Many providers offer “Renewal” or “Challenge” courses that are shorter and cheaper than the full initial course. However, these are often only available to those whose cards are still valid.
  3. Processing Time: While many digital cards are issued instantly, some employers require a verified physical copy which can take a few days to process.

If your card has already expired, don’t panic—but do act quickly. Most training centers will require you to take the full “Initial” course again if your card is even one day past its expiration date, as you are no longer eligible for the abbreviated renewal curriculum.

How do you choose the right renewal course?

Not all CPR classes are created equal. The “right” course for you depends entirely on your job requirements and your learning style. To make the best choice, ask yourself these three questions:

1. What does my employer require?

If you are a doctor, nurse, or paramedic, you likely need BLS (Basic Life Support) for Healthcare Providers. If you work in an office or a gym, a Heartsaver CPR/AED course is usually sufficient. Always check if your employer requires a specific accrediting body, such as the American Heart Association or the American Red Cross.

2. Which format fits my schedule?

  • In-Person: Best for hands-on learners who want immediate feedback from an instructor.
  • Blended Learning: The “gold standard” for busy professionals. You complete the lecture and testing portions online at your own pace, then drop in for a quick 30-minute hands-on skills check.
  • Online Only: Be cautious here. While convenient, 100% online courses often do not meet OSHA or workplace requirements because they lack a physical skills assessment on a manikin.

3. Does the course include AED training?

In the modern world, CPR and AEDs go hand-in-hand. Ensure your renewal course includes the latest protocols for using an Automated External Defibrillator on adults, children, and infants.

What should you expect during a CPR renewal class?

A renewal course is designed to be more efficient than your first class. Instead of starting from scratch, the instructor focuses on “refreshing” your existing knowledge and correcting any bad habits you may have picked up. You can typically expect the following:

  • Review of Core Techniques: You’ll revisit high-quality chest compressions (2 inches deep for adults) and the 30:2 compression-to-breath ratio.
  • AED Troubleshooting: You’ll practice applying pads quickly and following the voice prompts of the device.
  • Choking Relief: A refresher on the Heimlich maneuver for various age groups.
  • The Skills Test: You will be asked to demonstrate your skills on a manikin while the instructor observes. They aren’t looking for perfection, but they are looking for “competency”—meaning you can perform the steps safely and effectively.
  • Written Exam: Depending on the level of certification (like BLS), there may be a short multiple-choice quiz to verify your understanding of the theory.

How can you maintain your skills between renewals?

Two years is a long time. To ensure you don’t lose your edge between renewal cycles, consider these simple maintenance tips:

  • Watch a Video: Every six months, spend 5 minutes watching a YouTube video from a reputable source (like the AHA) on “Hands-Only CPR.”
  • Download an App: There are several free apps that provide step-by-step emergency guides and metronomes to help you keep the correct beat (100–120 compressions per minute).
  • Locate the AEDs: Whenever you are in a familiar place—like your office, the mall, or your gym—take note of where the nearest AED is located. Simply knowing where the equipment is can save precious minutes in a crisis.

Conclusion

Renewing your CPR certification is a small investment of time that pays massive dividends in safety and confidence. Whether you are doing it for a job requirement or simply to protect your loved ones, staying current ensures that if you are ever called to act, you will be ready.

Don’t wait for an emergency to realize your skills have faded. Check your card today, look for the expiration date, and get ahead of the curve.

Ready to update your skills? Contact CPR Classes Near Me today to find a renewal course that fits your schedule and keeps you certified!

Frequently Asked Questions (FAQ)

Q: Can I renew my CPR certification online?

A: Yes, you can complete the educational portion of your renewal online. However, if you need the certification for a workplace or professional license (OSHA compliance), you must also complete an in-person skills assessment with a certified instructor to receive your valid card.

Q: Is there a grace period after my CPR card expires?

A: Generally, no. Most accrediting bodies do not offer a grace period. Once the date on your card passes, you are technically uncertified. While some instructors may allow you into a renewal class within 30 days of expiration, many employers will consider you non-compliant the moment the card expires.

Q: How long does a CPR renewal class take?

A: A traditional in-person renewal class typically takes 2 to 3 hours. If you choose a blended learning format, the in-person skills check can often be completed in 30 to 45 minutes after you finish your online coursework.

Q: What is the difference between BLS and CPR renewal?

A: BLS (Basic Life Support) is a more advanced form of CPR training specifically designed for healthcare providers. It includes two-person CPR, bag-valve mask usage, and more intense testing. Standard CPR renewal (Heartsaver) is designed for laypeople and focuses on basic life-saving skills.

Q: Do I need to buy a new student manual for every renewal?

A: Most organizations require you to have access to the current student manual during your course. Since guidelines are updated every few years, it is important to ensure you are studying from the most recent edition provided by your training center.

Same-Day CPR Certification: How It Works (and Who It’s For)

Students performing CPR and ventilation on a training manikin in class

In a world where everything moves at the speed of light, waiting weeks for a certification card to arrive in the mail feels like a relic of the past. Whether you just landed a new job that starts Monday or your current credentials expired yesterday, the pressure to get certified quickly is real.

The good news? You don’t have to wait. Same-day CPR certification has revolutionized how professionals and everyday heroes get trained. At CPR Classes Near Me, we’ve streamlined the process so you can walk in, learn the skills, and walk out with your official American Heart Association (AHA) eCard in your inbox before you even get to your car.

But how exactly does it work, and is it the right choice for you? Let’s dive into the details.

What is same-day CPR certification?

Same-day CPR certification refers to a training format where the student completes all required coursework and hands-on skills assessments in a single day, receiving their official certification immediately upon completion.

Unlike traditional classes that might mail a paper certificate or take days to process paperwork, this modern approach uses the AHA’s digital eCard system. This ensures that as soon as your instructor marks you as “passed” in the system, your credentials are live and verifiable.

How does the same-day certification process work?

The process is designed to be efficient without cutting corners on the quality of training. Most same-day certifications follow one of two paths:

  1. The All-In-Person Method: You attend a scheduled class at a local training center. Over the course of 3 to 4 hours, an expert instructor guides you through videos, lectures, and—most importantly—physical practice on manikins. Once you pass the written (if required) and skills tests, your eCard is issued.
  2. The Blended Learning Method: This is the ultimate “time-saver.” You complete the “book work” and videos online at your own pace. Once finished, you schedule a “Skills Session” that usually lasts only 30 to 60 minutes. Because you’ve already done the theory, you just show up to prove you can do the physical compressions and use an AED.

Who is same-day CPR certification designed for?

While anyone can benefit from a fast turnaround, certain groups find same-day certification particularly vital:

  • Healthcare Professionals: Nurses, doctors, and EMTs often need Basic Life Support (BLS) certification to maintain their licenses. A gap in certification can mean being pulled from a shift.
  • New Hires: Many job offers in childcare, fitness, and construction are “contingent on certification.” Getting certified today means starting your paycheck sooner.
  • Busy Parents and Caregivers: If you only have a small window of childcare or free time, a “one-and-done” session is much more manageable than a multi-day course.
  • Students: Nursing or dental students often realize they need a specific AHA BLS card right before clinical rotations begin.

Is a same-day eCard as valid as a traditional card?

Yes, provided it is an official American Heart Association (AHA) eCard. In fact, most employers now prefer eCards over paper certificates because they are:

  • Tamper-proof: They cannot be easily forged.
  • Easy to Verify: Employers can scan a QR code to see the validity in seconds.
  • Impossible to Lose: Your card is stored digitally; you can download and print it as many times as you need.

At CPR Classes Near Me, we only issue AHA-accredited certifications, which are the gold standard for hospitals, schools, and government agencies nationwide.

Why is hands-on training required for same-day certs?

You might see websites offering “100% Online CPR” in 20 minutes. While these are fast, they are rarely accepted by employers. Why? Because you cannot learn the “muscle memory” of a chest compression by clicking a mouse.

OSHA and the AHA require a physical skills check on a manikin. Same-day certification at a physical location ensures:

  1. Correct Technique: An instructor can tell you if you aren’t pushing hard enough or fast enough.
  2. AED Familiarity: You get to handle a trainer AED, so you aren’t confused by the buttons during a real emergency.
  3. Real-Time Q&A: You can ask questions about specific scenarios, like what to do if the victim is in a confined space.

What should you bring to a same-day class?

To ensure you get your card on the same day, you should come prepared. Here is a quick checklist:

  • Comfortable Clothing: You will be on the floor or leaning over manikins. Wear clothes you can move in.
  • Online Completion Certificate: If you chose the “Blended Learning” route, you must bring the printed or digital certificate showing you finished the online portion.
  • A Valid Email Address: This is how your eCard is delivered. Double-check your spelling when you register!

How long does the certification last?

Regardless of how fast you get it, an AHA CPR or BLS certification is valid for two years. The expiration date will be clearly marked on your eCard. We recommend scheduling your renewal at least 30 days before that date to ensure you never have a lapse in coverage.

What are the benefits of choosing “CPR Classes Near Me”?

Choosing a local, specialized provider offers advantages that national “big box” training centers can’t match:

  • Speed: We focus on efficiency, ensuring you don’t spend a minute longer in class than necessary to master the skills.
  • Expertise: Our instructors are often local healthcare professionals who bring real-world experience to the table.
  • Availability: We offer frequent classes and skills sessions to fit your tight schedule.
  • Instant Gratification: We prioritize the immediate issuance of eCards so you can get back to work.

Conclusion

Same-day CPR certification isn’t just about speed; it’s about providing a path to compliance and confidence that fits into a modern lifestyle. By combining the flexibility of digital eCards with the rigors of hands-on training, you get the best of both worlds: a valid, employer-accepted certification and the ability to save a life starting today.

Don’t let an expired card or a new job requirement slow you down. Get trained, get certified, and get on with your day.

Need your CPR certification today? Contact CPR Classes Near Me now to find an upcoming session and secure your spot!

Frequently Asked Questions (FAQ)

Q: Can I get my CPR certification 100% online?

A: While you can learn the theory online, most employers (especially in healthcare and childcare) require a hands-on skills assessment. A “100% online” certificate without a manikin check is usually rejected by OSHA and the AHA.

Q: How soon will I receive my eCard after the class?

A: At CPR Classes Near Me, we aim to issue eCards immediately following the successful completion of your skills test. Most students have their card in their email inbox before they leave the building.

Q: Is the same-day certification more expensive?

A: Generally, no. The cost of a same-day class is comparable to any other high-quality AHA-accredited course. You are paying for the expertise of the instructor and the official AHA registration.

Q: What if I fail the skills test?

A: Our instructors are dedicated to your success. If you struggle with a specific skill, they will work with you, provide feedback, and allow you to practice until you can perform the technique correctly.

Q: Does my same-day certification include First Aid?

A: This depends on the specific course you register for. We offer BLS for Healthcare Providers, Heartsaver CPR/AED, and Heartsaver First Aid/CPR/AED. Make sure to select the course that meets your specific job requirements.